Thursday 31 January 2013

Upgrading the bathroom - Phase 1

When we first saw this house (at the open home) I noticed that there were no mirrors anywhere in the house, not even in the bathrooms. I'd never seen a house that didn't have a bathroom mirror. I've read that in Feng Shui, mirrors are believed to create an unbalance of energy in the house, so perhaps that's why they chose to have no mirrors? Anyway, I had a small mirror that I wasn't using so I hung it up. This is what the downstairs bathroom looked like after we moved in:
 
 
This is after we made a start on replacing the toilet:


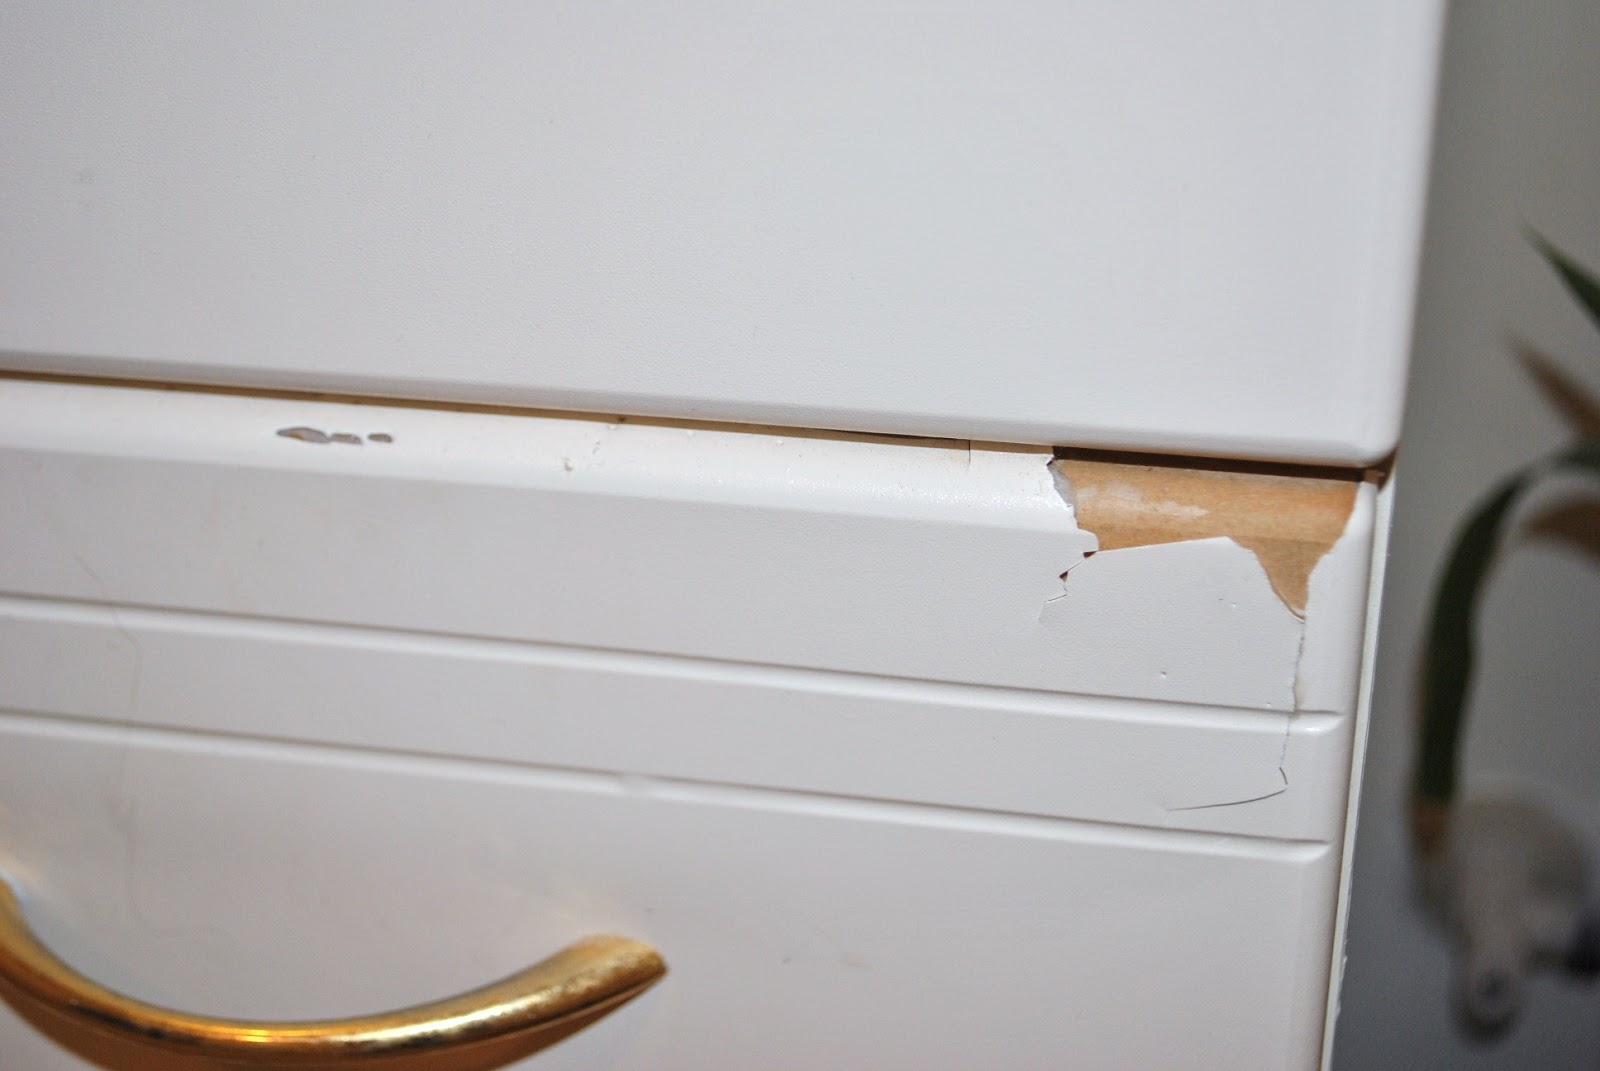
Bathroom vanity - before
There were several problems with the bathroom, so we made that room a priority. The toilet was leaking, so I changed the ballcock washer, but it still had another leak from underneath the cistern. Chris leaned over to have a look at it and snapped the pipe that feeds the bowl from the cistern, so we decided it was time for a new toilet. Since we were replacing the toilet, we decided it would be a good time to repaint the walls since they were a lilac colour and it made the bathroom look dark. Even the windowsills were painted in the lilac colour, so the windows looked small and dark. I hate seeing the crack on the laminated plastic vanity's draws, but that will have to wait another day.
 
The last thing we wanted to fix immediately was the extractor fan. It was completely gunked up with dust and looked disgusting, so we decided to replace it with a new fan. That job required an electrician. We replaced the toilet and did the painting ourselves.
 
We chose Resene's Pearl Lusta (a pretty cream colour) for the bathroom. I know cream paint doesn't go so well with the existing beige bathtub and beige vanity, but it will have to do for now until we upgrade those. We chose a waterbourne enamel paint designed for the kitchen & bathroom, since it would need to withstand high humidity and repel mould spores. For the windows we used Dulux Aquanamel in Vivid Gloss White. I chose a gloss white to reflect the sunlight on the windowsill, to maximise light in the room. The bathroom is not on the sunny side of the house so I wanted to increase the light as much as possible.
 
 
The trick to painting with a roller is to always roll upwards on the first stroke. That way any extra paint on the roller will get rolled upwards onto the wall, whereas if you rolled downwards it will drip on the floor. Here is the result after painting the walls and windows, and replacing the extractor fan. After painting, we bought a bathroom mirror from Bunnings for $99. The mirror has a very dark brown (almost black) frame with a silver/bronze colour on the inner edge of the frame.
 
After painting and replacing the fan
The new toilet:
 
Replacing the toilet was fairly easy but it took us about 2 hours since we had never replaced one before, so we read the instructions carefully as we went. The hardest part was choosing the right toilet. I knew our toilet was an S-trap because the waste pipe led into the floor, whereas a P-trap would lead into the wall (the upstairs toilet is a P-trap). Next I measured the distance between the wall and the 'hole' (the hole in the floor that directs the waste into the sewer). Lastly, I noted down whether the inlet water tap was on the left or right side (ours was located on the left side of the toilet).
 
We took our measurements down to the hardware store and the guy pointed out which S-trap toilets would fit our bathroom. We chose an Englefield toilet that has a ceramic cistern. Plastic cisterns are much lighter and easier to install, but I find plastic dulls and scratches with time, losing its shine. Ceramic will hold its shine for years so its worth paying a little extra for.
 
Many of the toilet models these days are built so that the cistern hose can connect on either the right or left side of the cistern (you just plug up whichever side you're not using). Unfortunately the toilet we chose didn't - it only had a right side hole in its cistern (our cistern tap is on the left) so we had to buy a long cistern hose to correct the problem. The last things we needed were a rubber toilet gasket (its upside down in this photo) and toggle wall anchors.

I watched a few YouTube videos (from the US) and noticed that people there use a wax ring (wax gasket). Every country is different so you'll just have to ask the store which gasket is used where you live. Anyway, the bottom (smaller end) of the rubber gasket sits in the sewer hole and then the toilet is placed on top of this (with the S-trap pipe sitting in the bung), so that waste water cannot leak out.
 
Since a ceramic toilet cistern is pretty heavy, and much heavier once its filled with water, we bought two heavy-duty toggle wall anchors. There were no studs in the drywall (plasterboard) where we needed to place our cistern screws, so without studs to drill into, we had to buy strong wall anchors. The anchors are easy to install, but I measured and marked the places twice before drilling to avoid any mistakes.
 
The cistern components were mostly pre-assembled and fitted, so there were only a few things we had to do there. We had to cut the flush button rods to size and fit those in, but that was pretty straight forward. I used an adjustable wrench to attach the cistern hose to the cistern and the inlet.
 
After installing the toilet and turning the inlet tap back on I found that there was slight leak where I had connected the inlet to the new hose, but a little extra tightening with the wrench fixed that problem. One last problem we encounted was that our masonry drill bits completely failed to penetrate the concrete under the lino when we went to put the two toilet bowl bolts in. Luckily the electrician had arrived to replace the fan, and he had a proper concrete drill in his truck so we borrowed that to finish off the job.

Last of all, I applied a line of white caulking around the toilet and smoothed it with my finger. We finished off by applying the caulking to top edge of the bath and around the top of the vanity. The tube of caulk said "white" but it was actually more of a creamy white so it went well with our bathroom. We didn't go around the whole vanity since we're planning on pulling it out and replacing it anyway.
 
Overall, the toilet, hose and gasket only cost us $180, and then we spent about $15 on the wall anchors. We saved a lot of money by not hiring a plumber to do this job, but having said that, our house is fairly modern so exchanging a 1990s style toilet for a 2013 model isn't very difficult. If you have an old house you won't be replacing like with like, since toilet technology has changed a lot of over the decades. In an older house, chances are you'll need a plumber to upgrade some of the pipes before a modern style toilet can be fitted.
 
So this was Phase 1 of our bathroom upgrade. There is still a lot to be done. The bathroom doesn't have a heater, the lino flooring looks worn, the shower head needs replacing, the shower tower (soap stand) needs replacing, and the vanity needs replacing. No matter how much I scrub the vanity sink, it doesn't come clean (another reason I don't like plastic for sinks and toilet cisterns - plastic stains permanently). My plan is to build a timber vanity and stain it a dark brown colour like the new mirror :)


How to fix scratches on an appliance

We've moved three times in the past year and a bit, and our poor washing machine ended up with a lot of scratches on its paint:


This is a simple problem to correct with an acrylic lacquer spray paint. We've used Dulux Spraypak Appliance White - an acrylic lacquer especially designed for touching up scratches on fridges, washing machines, dishwashers, laundry tubs, or any other white appliance.


Its easy to use. First, clean the area to remove all dust and dirt. Then spray onto the scratches in the same method that you'd use any spray paint. If there are any areas that you don't want spray painted, simply use marking tape to protect these areas, or for larger areas I just use newspaper taped onto the area to protect it from paint.

Be very careful to only use a light spray or you'll end up with a gluggy mess. Its easier to do it lightly and apply more later, than apply too much and have to clean off gluggy paint. Once it was thoroughly dry, I sprayed a tiny bit more onto some of the really bad scratches that hadn't quite been covered. And here is the finished result:

Wednesday 30 January 2013

Healthy honey mustard mayonnaise


Now that we have five hens, we need to think of more ways to use up the fresh eggs in our cooking! We were out of mayonnaise once so Chris suggested we try a homemade recipe. There are a few variations based on your preferences, so I've listed these below. Please note that mayonnaise is made using raw eggs and therefore you must be confident that the eggs you are using have come from a good quality source to avoid salmonella poisoning. We make our mayonnaise from the eggs that we collected that day so they're nice and fresh.

For mustard, we use a strong-ish tasting wholegrain mustard so we only use 1 tbsp. If you are using a mild mustard, you might like to use 2 tbsp. For vinegar, we vary between using white, malt and cider vinegar. You can also use lemon juice instead. We use a light olive oil for our mayo. We once tried an extra virgin olive oil but it tasted bitter.

Honey mustard mayonnaise
2 fresh eggs (whole, not just the yolks)
1/2 teaspoon salt
1 tablespoon of your choice of mustard
1 tablespoon of your choice of vinegar (or use lemon juice)
1 tablespoon of runny honey
1 3/4 cups of olive oil

We use a sealable plastic container to make it in so that we can store ours in the fridge after we make it. We add all of the ingredients (except the oil) and use a stick blender to process it all until its well mixed. Now pour the oil in gradually as you blend the mixture. Once all of the oil has been added, you'll have a smooth mayonnaise.

 
If you've never made homemade mayo, you'll notice that its more yellow than the white mayo sold at the supermarket. This is because store brands use powered egg or an egg substitute for shelf longevity. Your homemade mayo should last up to two weeks in the fridge, but it depends on how old the eggs are that you have used.

We lavish our mayo on potato salad, bread, vegetables and whatever else we feel like.

ps - olive oil is very good for you. I was recently reading about Jeanne Calment, a French woman who lived to 122 years old (the oldest recorded in history). She credited her longevity to pouring olive oil on her meals.

About our new house

We moved into this house on 27th Nov 2012 (two months ago). Its a pretty large house at 270m2 (2,906 square feet) for just the two of us and our ex-racing greyhound (Milo) who we adopted 6 months ago. The land size is 1390m2 (a bit over a third of acre), located near the beach so we have a sunny climate with sandy soil. Its the middle of summer now (January and February are the hottest months) and our poor veggie garden is getting scorched from the sun. The lawn is brown and crispy from lack of rain.

One strange thing about this house is that despite the large size of it, it only has three bedrooms. Oddly it was built to have three living areas and three bedrooms, plus a loft area. Judging by the flowery wallpaper that we found behind the toilet cistern when we replaced the downstairs toilet, I'm thinking that the couple who had this house built were retired people who wanted a large place for their hobbies but didn't need many bedrooms. In the future we'll turn it into a four or five bedroom house.

The weirdest thing about this house is that its only 14 years old, but it wasn't maintained well or finished properly in the first place, so its going to be a big project for us over the next few years. Here is some evidence:

Laundry room
Rotten laundry room skirting boards
The laundry is one of the worst rooms in this house. I secretly suspect it may be one of the worst laundry rooms in the world even. I did a Google search for "ugliest laundry rooms" and I'm pretty sure ours was up there in the top three. I often see laundry rooms with signs hanging up saying "wash" or "laundry". I'm thinking of making a sign that says "world's worst laundry room". The photos above don't do it justice since I haven't taken a close-up photo of the DIY tile job above the laundry tub. They've taken (very) old '60s tiles and instead of using tile adhesive and grout, I think builder's fill was used because its as hard as concrete. Each tile has been added separately (and unevenly) so it must have taken them ages. Its going to take me ages to get each of those back off.

The previous owners had let their washing machine leak so the skirting boards in the laundry are completely rotten. They had conveniently covered this up by placing things in front of the wall, so we didn't know about the damage when we bought this house. Pretty bad for a house that is only 14 years old, right? We've decided that we'll have to leave the laundry room until last, because we need to use the laundry tub to clean our paint brushes from painting the rest of the house.  

The garage was so full of the previous owners' possessions that in some places items were piled up to the ceiling. When we moved in, we were pleasantly surprised to discover that the garage actually has two windows, but one was just completely covered up by junk. Its actually a sunny area rather than the dark, scary garage we thought it was when we viewed the house. The plasterboard in the garage looks like a DIY job because there are some large gaps in many places. These weren't plastered or painted, and the plasterboard has become grimy and stained.


The downstairs bathroom was pretty bad so we started tackling that room shortly after moving in. Mainly because the toilet was leaking, and partly because the bathroom was dirty which is never a good look for a bathroom. The kitchen is rough but has four pantries, so there is plenty of storage space. We'll leave that room for now.

There is a loft room above the garage that is completely unfinished. It doesn't even have plasterboard walls, just exposed timber framing. We want to get onto that pretty soon. When our offer on the house was accepted, we hired a building inspector to check over everything to make sure the house was safe. He took me aside and said "You do realise that this house is a little...unfinished?". I laughed and said I did notice the timber framing with no plasterboard on it, so we know what we're getting into.

The third acre section was massively overgrown so we spent our Xmas break sawing and cutting so that we actually had access to the area that we wanted to put our pet hens in. It took hours of cutting branches and digging up roots. We've taken several car loads of branches to the landfill, but we still have another large pile looming there waiting for us.

Next door there is an abandoned house with long grass growing on the front lawn. The house looks about 80 years old and we refer to it as 'The Haunted House'. Apparently some nutcase relocated it there 10 years ago after getting permission from the neighbours to put a relocatable home on the empty section (the neighbours agreed thinking it was a new relocatable home). Its odd because all the other houses on this side of the street are modern (built within the last 15-20 years), and then there is this haunted looking abandoned house there amongst the modern houses. I've planted two flowering cherry trees on our property so that when they reach their full height (5m), they'll mostly hide the ugly house with beautiful cherry blossoms. They'll take 2 years to get to that stage though.

Tuesday 29 January 2013

Removing lichen and algae from a fence

We have a decorative feature fence that our patio looks out onto, designed to hide the compost bins, the hen house and the ugly abandoned house next door. When we bought this house two months ago, the decorative fence was covered in lichen and green and yellow algae. Some parts of the fence had broken timber slats as well. Not only that, but the plants on it so were so overgrown that the whole thing looked pretty rough. The centre of the fence has a diamond shaped area that had once had a pergola, but now the pergola was just warped, sunken timber rails that looked a little dangerous.

Feature fence before

On the right of this photo, you can see the overgrown diamond shaped pergola. We couldn't use this area as a sitting area because it was so overgrown with plants. I suggested that we pull the whole feature fence down because it looked so bad, and also to make our lawn area larger. Chris was adamant that he could repair the feature fence and make it look good again so we went with his plan (because it was a lot easier that pulling a fence down).

Chris had to remove all of the bent pergola pieces of timber using a crow bar and a hammer, and then he sawed off the posts. There was a post in the centre so he had to dig this one out. We transplanted the yuccas that were in the middle of the diamond shaped area and replanted them off to the side.

We dug out all of the scraggly bushes and then dug up the agapanthus (the plant with the purple flowers) and using a hand saw, we split each into four so we could transplant them all evenly along the fence instead of having a few large clumps of agapanthus here and there. Agapanthus roots are just so clustered together that we found that sawing the plant into quarters was much easier than trying to pull them apart. The leaves look a little yellowed due to the rough treatment, but they'll spring back in no time. We've also planted three grape vines along the fence, but they're difficult to see in the after photo.

The final step was water blasting (pressure blasting) the fence to remove all of the algae and lichen. Chris used a Karcher water blaster (a German brand). It came with a general purpose cleaning fluid that helps to clean as the water blaster removes the dirt. It took quite a while and Chris had to go over the whole fence twice, but eventually it came up really well and all the lichen and algae is gone.

We fixed up the broken timber slats by attaching metal brackets to the other side. It looks almost new now. Some time in the future we're planning on turning the grassy diamond shaped area into a tidy paved area, but for now its a big improvement over what it was and the picnic table can fit into that area.

After:


Adding a decorative retaining step

When we bought our house, the edging around the patio looked like this (pictured). The patio itself is made of concrete and is in good condition, but the paths leading off the patio on the right, left and centre all featured sunken, uneven pavers overgrown with weeds and grass.

 
Right side pathway leading from the patio - before
Our local ITM (timber suppliers) sold macrocarpa sleepers 2.1m (6.9 feet) long for $28 each, so we bought seven of these and asked them to cut one into quarters and one into halfs. They do the cuts and delivery for free, so that made it much easier for us since sleepers are very heavy. Macrocarpa is an orange colour but after exposure to the sun it turns grey. In the photo some are grey and some are orange, but they'll all turn to grey with time.

We also bought 25 timber stakes (50x50mm) and a packet of 100mm nails (4 inches). From another local supplier we found 20L bags of white shells for only $10 each so we got three of these. The shells look yellowish when they are wet in the bags, but they're actually a beautiful white when they're dry. We live 6kms from a beach, so we liked the idea of using shells in our landscaping and it works well with our sandy soil type. We bought eight pavers to go in the step area that we're creating to frame the view from the patio to the lawn, and the shells will be place surrounding the pavers.

We dug out the edges of the lawn around the patio and began laying down our macrocarpa sleepers. I wanted it to look professional so I measured everything carefully with a tape measure to make sure that the sleepers were all placed at the same height (as measured from the patio) and I used a spirit level. We dug out deeper holes to place the stakes, and once positioned, we used the 100mm nails to secure the stakes to the sleepers to prevent the soil from pushing the sleepers forward over time. The stakes are buried deeper than the sleeper so that they won't be seen once the soil has been replaced. We also used one nail to secure each sleeper together (nailed through the top at a 45 degree angle).
 
We've placed the pavers down roughly in the step area just to see how it looks. Because we live near the beach, our soil is very sandy. This makes it easy to lay pavers since sand is ideal as a bedding medium for pavers.

The area on the front right of the patio already had an overgrown garden that had tall, unhealthy looking yuccas blocking the view from the patio to the lawn. The master bedroom has floor length windows that look out on that garden so we wanted it to look good. We dug everything out of the area and kept the blue grasses and blue/silver flaxes for replanting after we had placed our retaining sleepers. I want to plant dry tolerant purple lavender plants and white ground cover roses in that area. In the photo I've only planted a few lavenders because I plan to take cuttings to propagate the rest of them (to save money).


The lawn area on the left side of the patio had three overgrown trees planted there. We kept the tallest one since it provides shade for the house. We created a symmetrical garden bed to match the one on the right, but we've used bark chips here and purchased a lemon (Yen Ben) to go in this area. We've also planted one red rose under the shade of the tree, so we'll probably buy a few more red roses and citrus trees, then frame the area with lavender like the right side. The floor length windows in the living room look out to this garden bed, so we thought red roses and lavender would be nice to look at.

I used some of the timber stakes to place between the pavers to create even spacing as we positioned the pavers onto the sand. We also used the tape measure and level to make sure each was the same height and sitting flat. The pavers are quite thick (about 5cm or 2 inches) so their heavy weight means they won't move around much. Once positioned evenly, we added about 2.5cm (one inch) of sand and pressed this down before tipping the shells into the gaps. We only ended up using 1.5 bags of shells, so we still had plenty left over for other projects.

We back-filled the soil back against our retaining step and then walked on it to compress it. We then added grass seed to the soil.

I tied string around our outdoor chairs and placed them there to stop our dog walking on the lawn seed.


 Here is the finished result after allowing two weeks for the grass seeds to grow:
Our greyhound always likes to pose when I'm taking photos, so here's another without the greyhound obscuring the view of the step:
In the future we might stain the sleepers a nicer colour, but for now we're quite happy with the sunbleached timber look so we'll stick with that (since its cheaper to just leave it). I'll post more photos in the future when the lavender plants have fully grown.


Monday 28 January 2013

Keeping the cost of home grown food down

The whole grow-your-own food movement has become very popular as people try to save money, educate kids about the life cycle of plants, or just get out there and enjoy nature. Plenty of large stores are capitalising on the popularity of growing food by selling ready-made container gardens, compost, garden tools etc. But getting started can end up costing more than you’ll save from 5 years of growing veges. This is fine if you’ve got the funds to spend on your hobby, but not if you’re doing it to save money.

Here are some ideas from my own experience for keeping the cost down:

Second-hand tools. Our local second-hand store has a selection of old garden tools that still have plenty of life left in the them. Check out your local second-hand stores and see what treasures they have for sale.

Timber. If you’re building a timber container garden for your plants, check out your local builder’s recycling store. They have all sorts of used timber that you can reuse for your garden beds or use to make a compost bin.

Tyres. Used tyres are completely free. Your local car garage will give these to you for free or otherwise you can take them from recycling centres. We’ve all heard of using tyres to grow potatoes in, but you can grow many veges and flowers in these. Stack them two high for carrots or large tomato plants, otherwise one tyre should be fine for a courgette (zucchini), capsicum (bell peppers) etc, and you can easily get plenty of radishes or spinach in one tyre. You’re probably thinking that a bunch of tyres in your backyard sounds pretty ugly, but if you’ve got kids they’ll be kept busy for hours painting pretty pictures and colours on the tyres. Hand them a pack of coloured chalk, or if you don’t mind the mess of paint, let them paint their names on the tyres.

Don’t go overboard. When I was new to gardening, I went out and bought 20 packets of seeds so I could plant a few of everything. The seeds left in the packets went mouldy after two years so it was big waste of money. Also, different plants have different pests and require different fertilisers so I ended up having to spent quite a lot. If you’re new to gardening, I’d recommend just starting with four or five or your favourites such as corn, strawberries, potatoes, courgette and tomato. I don’t have to use any pesticides on these veges in my area (your region may be different) but the strawberries will be severely attacked by birds so you’ll need netting for those (or a glasshouse).

Compost and manure. Our neighbours have horses so we go over and collect the manure for free, but if you don’t know anyone with horses, charities such as Riding for the Disabled often sell horse manure for a few dollars to raise money for their charity. A local egg farm in our area sells large bags of chicken manure for a few dollars. Add the manure to the lawn clippings and leaves in your compost bin and you’ll save heaps by not buying store bought compost.

Use corn stalks instead of buying netting or stakes. If you plant a bean seed next to a corn seed, the bean stalk will be able to grow up the corn stalk saving you the cost of buying a stake or netting for your beans.

Building a low fence


The front of our section already had a 1.8m fence and gate, but we built two low fences 1.1m high (3.6 feet) on either side of our driveway to prevent our ex-racing greyhound, Milo, from running onto the dangerous area of the driveway where cars are reversing. As you can imagine, a very fast and excitable hound is a problem on the driveway.

At this stage, we just built the fence with two railings (railings are the horizontal part) but in the future we’ll be adding pickets to create a lovely picket fence. Picket fences add a lot of charm and I’m planning on planting lavender and other flowers in front of each post. I calculated that the pickets would have cost us $150, so we’ll do those later when we save up some more money.

The distance between our boundary fence and the house was exactly 8m, so that it made it easier to build since we were able to place all posts exactly 2m apart. We added a 3.2m gate into the second fence that we built, just in case we ever needed to drive vehicles around to our backyard. In this post I’ve only explained how we built the first fence (without a gate).

I purchased our fencing materials from our local ITM store (a timber yard), and they delivered it all for free that afternoon. I came prepared with my list of materials so I just went up to the counter and ordered it all there. I didn’t even have to go out into the timber yard so that saved time. I’ve listed the approx amount we paid for each of the materials (in NZ$, rounded to whole numbers).

Difficulty: Easy-moderate. I’d rate this job as easy, except that the bags of concrete weighed 30kg each and I weigh 55kg so I could barely even drag them along the ground when they were delivered. Luckily I had a free labourer (my husband), but you could easily hire someone from Student Job Search or Hire-a-Hubby if you need someone to do the hard jobs like digging the holes, picking up the concrete and sawing the tops off the posts.

We used:
- 100mm x 75mm H4 treated rough sawn posts. We used four of these rather than five for our 8m fence, because the left side of the fence connects to one of the posts in our boundary fence. This meant we were able to nail the rails directly into that post. Since I was building a 1.1m high fence, the posts needed to be buried 400mm which means I needed 1.5m posts. ITM only had them in 1.8m so we just sawed 30cm off the top when we had finished adding the rails to the fence. Approx cost = $9 per post.

- 100 x 50mm rough sawn rails treated to H3. Rail lengths were available in 4.8m and 6.0m. We purchased two of the 6m lengths, and the store cut two 2m lengths for us to make it up to the 8m fence length we required. We nailed our rails to the front of the posts, but another technique is to nail them between the posts. That technique would have involved more work because we would need to saw all of the rails to fit them between the posts (and we don't own a power saw).
The fence rails should follow the line of the terrain, so if the land slopes downwards, so will your fence rails. Our property is flat for the first 6m and then dips down towards the house for the 2m on the right side. We placed the 6m lengths on the left side and the 2m rails on the right, so the fence could follow the slope of the land.
Approx cost of timber rails = $4 per lineal metre.

- three 30kg bags of 15 minute ready-mix concrete. We used ¾ of a bag for each of the four posts. Approx cost = $11.90 per bag.

- a pack of 100mm galvanised flat head nails ($7.40 for a bag of 44 nails).

We also used a spade, hammer, tape measure, string, hand saw, spirit level and drill (to pre-drill the nail holes). We had all of these already. Don’t forget suncream, sunglasses and a hat. I got a sunburnt plumber’s crack from this job due to all the bending down, so be warned!

How we built it:

1. After the timber was delivered, we placed it in the shade to prevent it from warping in the sun.

2. I placed a small nail into the boundary fence post and another into the porch post, then tied string between them to indicate the line where our fence posts would be placed.

3. We placed the tape measure on the ground and marked out every 2m where we would be placing the posts. You can use spray paint for this if it helps (we didn’t bother).

4. Chris dug out the post holes to the correct depth (400mm). We double checked that our posts could sit in the holes properly touching the string line and placed the spirit level on top of the post to ensure that the post was straight and level. Note that the correct way to place 100x75mm posts is with the narrow side facing forwards. We chose to place the 100mm side forwards because we thought it looked better that way.

5. If you were building the fence by yourself you’d need to brace the post in the hole, but in our case, I just held it (ensuring the post was still on the string line and the spirit level was straight) while Chris poured the water and then concrete. We poured two buckets of water into the hole because our soil is very sandy so the water drains away quickly. If your property has clay-based soil then you wouldn’t need this much water. Chris then poured ¾ of a bag of 15 minute setting concrete into the hole and stabbed around with a stake to ensure there were no air pockets. Within a minute the concrete was strong enough to hold the post so I could let go.

6. We repeated this for all of our posts and then left them alone for 2 full days to give the concrete time to cure in the sun. Even 15 minute setting concrete needs time to cure before you go attacking the post with the hammer and nails to get the rails on.

7. We refilled our post holes with dirt and then I drew a pencil line on each post at 400mm and 800mm from the ground. I then took the hammer and half-way nailed a 5cm nail into each pencil line as a temporary guide for the rails (these were removed afterwards). The guide nails allowed us to place the rails onto the posts and then step back to see if we were happy with how it looked. The guide nails also hold the rails in place while you are nailing them in.

We chose 400mm and 800mm for our rail heights because it was the right height to stop our dog squeezing through the middle or under the fence. If we were adding pickets onto it straight away, we would have chosen 200mm or 300mm from the ground for the lower rail.

8. We then pre-drilled our nail holes in the rails (I used a 3.5mm drill bit for that) and then hammered the big daddy 100mm nails through the rails into the posts. One of us braced the post while the other nailed, to keep the posts steady when the hammer was swinging at it. Once these are in you won’t be getting them out easily so that is why we used guide nails to check everything before committing to the rail heights. After this step we removed the guide nails.


9. At this point we measured 1.1m from the ground and pencilled a line onto the posts. Using the hand saw, we sawed off the top of the posts at an angle. The angle is so that rainwater can run off the top of the post rather than sitting and rotting the post. Some people use a power saw for this job since its not easy sawing the top off a post, but we don’t own one and we needed the exercise after eating too much over Xmas.
Another idea is to buy a decorative post cap instead of sawing an angle into the post. This costs more, but there are plenty of great designs for post caps and your fence will look more professional.

 
10. The next step was to paint the posts and rails with one coat of white paint.

Total cost = $143. This does not include the white paint though - we already had the white paint from a previous project.


Thursday 24 January 2013

Adding palings to a timber fence

Fence (in background) before
The house next door to ours has been unoccupied for some time and the grass has grown pretty long. It looks pretty bad. A rough fence had been constructed between our property and theirs, but it just consisted of railings and posts with some green shade cloth nailed into it. I'm guessing the shade cloth was meant to be for privacy? But we could see right through it into their overgrown front yard.

The fence posts are about 1.55m tall, so this made the fence perfect for fitting 1.5m palings onto it (you need to allow some space at the bottom for rainwater run-off or the palings will begin to rot). The 1.5m rough sawn palings were about $3 each.

The downside was that the existing fence wasn't built very well. Some posts are spaced far apart and others are close together. The worst thing is that the posts aren't straight - some lean towards each other. This makes it much harder to evenly space the palings to get a professional look.
 

Most people just turn one paling on its thin edge and use that as a spacing guide for adding palings to a fence. In our case, we needed to hide the fact that the posts were so uneven, so where a post leaned towards us we had to butt the paling right next to it at the top and then leave a 2.5cm (1") gap at the bottom. The finished product won't win a fence building contest, but I think its a vast improvement over how it looked before. And best of all, we can no longer see the awful overgrown front yard next door!

Fence after
We also removed an enormous overgrown rosemary bush from the far left corner, so that has added a lot of space. We had tried to transplant a small tree to the front of our new fence, but unfortunately it didn't make it so we now have a dead, brown tree until we plant another. 

We waterblasted the foreground fence (twice) to get it looking like new again. The foreground fence is a decorative fence that was placed there to hide compost bins, the hen house and anything else you want to hide away. We planted some agapanthus in front of it to add some colour. We're really pleased with how clean and tidy this corner looks now compared to the 'before' photo when we bought the house.

ps - we used 50mm fence paling nails and the guy at the hardware store convinced Chris to buy a 5kg bucket of them to "save money by buying in bulk". We had 95% of them left after finishing the job! Lesson learned, don't fall for the 'buy in bulk' sales pitch.


Wednesday 23 January 2013

Applying jointing compound to plasterboard

Garage before
Wide gaps in the plasterboard


This is what our garage looked like when we bought our house. I think the original owner did a DIY job with the plasterboard because there were some pretty big gaps. At some stage someone has added plaster to a couple of the nail heads, and then left it at that. We wanted a clean white garage, so the first step was to fill in those joints so we could get an even finish for painting.

Filling the joints is fairly straight forward and the materials are inexpensive. I bought a 4kg tub of GIB Plus4 for $24. This is ready-mixed jointing compound, so there was no need to mess around mixing water and plaster. I used a 275mm (11") plastering trowel (this cost $14) and bought a 25m roll of GIB papertape for about $9. Jointing tape contains tiny perforated holes that allow the air to escape as its drying.


Before
Jointing compound applied
 
Using the trowel, I applied a layer of the jointing compound to the joint.

I then took my piece of jointing tape (I'd already measured and cut a piece off that was the right length for the joint) and pressed this over the plastered joint, using my finger to smooth it on so there were no trapped air bubbles.


With jointing tape applied
After applying the tape, I smoothed another layer of jointing compound over the tape. To finish off, I smoothed away any excess on the far edges. Once it has dried the plaster will need a light sanding to blend out any plaster lines before painting. Its easier to remove any excess and blobs of plaster now rather than wasting time sanding them down after it has dried.

I also applied a little compound to some of the nail heads, but since its only the garage, I only fixed up the worst of them.


The last photo shows the dried plaster all ready for sanding. My plastering won't win any beauty contests, but neither will this garage given the rough plasterboard job and all the nail holes in the walls. After sanding and painting the garage we were really happy with final look. I'll post photos of that later on.


DIY free chicken feeder

I've seen some pricey chicken feeders and waterers for sale promising to protect the feed from rodents, sparrows and from the chickens pooping in the feed. But you can easily make a chicken feeder/waterer for free for a small flock of hens.

Below is photo I took of a 2L plastic milk bottle that I converted into a feeder. For this one I used a hacksaw to saw the top off at an angle to allow the hens to reach in. I've found its actually easier to just use a Stanley knife (or kitchen knife) so that's what I've used for subsequent models.
I tied a piece of fine rope around the handle and tied the feeder to the wall in the chicken coup so that the container hangs about 5cm (2 inches) off the ground. My hens can easily eat out of it but rodents would have a hard time climbing up to the food. Its also harder for sparrows to steal the food since its difficult for them to land on this feeder.

For water, I hang the bottles in the outer run where I can easily refill them with my watering can each day. I place several of these feeders and waterers around to ensure that there is enough food and water for all of the hens (we have five hens). One of our hens is a bully and hogs the food, but by hanging these feeders around in different corners, it prevents her from hoarding a single food source.