
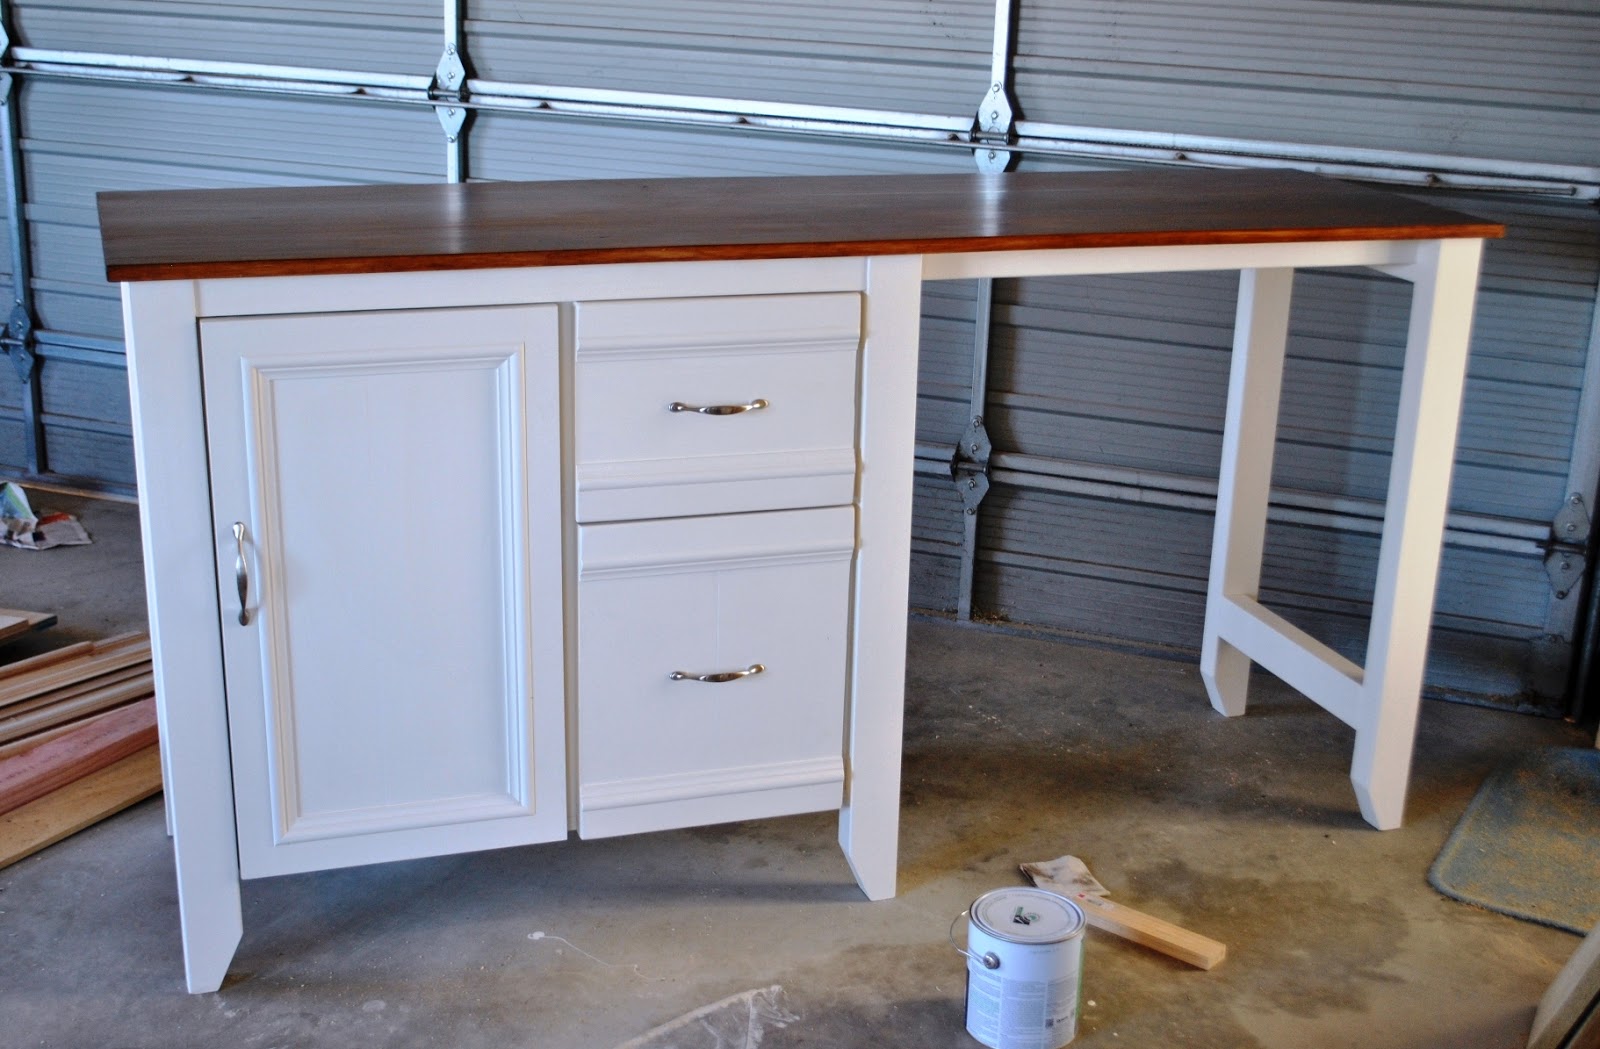
Here is the finished laundry bench. It took me about 3 weeks to build this (in between doing other DIY jobs) so by the end of it I really just wanted to have it done so I could move onto something new :). This was my first attempt at building cabinets, drawers or a large table (except for the work bench that I built for the garage) so I'm really pleased with the finished product, and it will look so much better once I've finished the wall behind it and added white washed timber flooring over the cold concrete.
I built it 1.8m long (6 feet) because I wanted to have enough space to fit a cupboard and drawers while still having room under the bench for a clothes drier (if we buy one in the future) and/or laundry baskets. You can't see it in this photo, but the window looks out onto our vegetable garden and behind the garden fence is trees and hills. Its quite a beautiful view to look out to while folding the laundry so it was important to me to keep that in mind when I drew up rough plans to make this laundry bench.
I didn't follow any plans when I made this, I just scribbled out the dimensions (90cm tall, 1.8m long etc) and worked out (roughly) how much timber I needed. For its legs I just used boric gauge (borer treated) 2x3s (50x75mm) pine. I wanted completely untreated 2x3's since I don't like treated timber inside the house but the timber place only stocked it treated, and boric gauge is the lowest treatment level they had (its about H1). Due to the pink colour of the treatment, I had to paint the laundry table with primer before I painted on my final French cream colour to ensure the cream colour didn't turn pink over time.
Here are the 2x3's cut and ready to go to make the frame. I used my mitre saw to cut angles into the bottom of the legs pieces to make it look French country style.

For the framing piece that runs along the back of the table connecting the leg sections together, I used the notch technique. This is fairly simple to do. I just measured the width of the table leg and then marked it onto the timber. I set the circular saw blade depth to 2cm and then cut about a dozen cuts across the timber. I used a hammer and chisel to break off the "fingers" that are formed from all the cuts. The result is a notch like this (this is the middle notch):

I repeated the notching to create notches on each end also (for the end legs). Here is the frame screwed and glued together:

I used Selley's exterior PVA woodworking glue for this laundry table because it is waterproof. I thought it would be better safe than sorry for the laundry area.
For the table top, I glued three pieces of 180x19mm x1.8m long knotted pine together. I used knotted pine because it is exactly half the price of clear grade pine and I love the natural look of the knots anyway. I used four long clamps to hold the pieces tightly together, but the more the better. Once the glue was dry I thoroughly sanded it before staining it with two coats of walnut coloured stain. When this was dry, I applied four coats of oil-based satin polyurethane using a roller (a roller gets a smoother finish than a brush on large table tops). I sanded lightly between coats and waited a day between each so this part took quite awhile. It would be a lot quicker to just paint the table top in cream like the rest of the table, but I love the classy look of a walnut stain. The hardest part with poly is to keep any pet hairs and small insects off it while it dries.

For the back board of the cabinet and on the sides, I wanted a grooved plywood to create that French tongue and groove panelling look. Unfortunately no one in my area seems to stock grooved plywood and was too expensive to get it sent from the larger cities, so I just set my circular saw to a depth of 2mm and cut "fake" rip cuts into my 7mm (1/4 inch) ply. The result looked pretty good:

I made the draws using the 7mm ply on the bottom and 18mm thick (3/4 inch) ply on the sides. The sides are glued and screwed, and the bottom is glued and brad nailed on.

For the cabinet carcass, door and drawer faces I used the same pine that I used for the table top (19mm thick pine - approx 3/4 inch). I used 40x10mm pine on the door and drawer faces to create the decorative framed look, and then used pine moulding glued onto the inside edge.
To paint it all I used a Wagner paint spraying machine. I prefer the finish on a spray job and it would have taken me all day to paint all this with a brush. The paint sprayers are annoying to clean and use up more paint, but they save so much time and I like the professional looking sprayed finish. I added about 20% water to my water-based paint to get the runny thickness required for spray machines. The colour I have used is Resene Eighth Sisal and the paint type is a hard wearing Bathroom/Kitchen paint for wet areas.

I fitted soft-close hinges (also known as Euro hinges) to the door. I love soft close hinges but I would never use them again on pine doors. To fit soft-close hinges, a 35mm wide hole (12mm deep) needs to be drilled into the door and this was surprisingly difficult with the pine. I drilled the holes before painting the doors which was fortunate because the drill bit moved around a lot and I had to fill in some rough parts with wood filler and sand it again. I've since built wall cabinets for the area above the laundry sink and this time I used 18mm ply instead of using pine. The ply was much easier to drill the 35mm hole into.

The final step was to screw the bench top onto the frame. I've read that when a table top is made from glued together wood (such as glued laminated wood or just gluing pine together like I did) there is a risk that over time the glued joins can start to split due to the pressure of the table base expanding/contracting under it. I live in an area with very mild temperatures (light frosts in mid-winter and mild summers) so fortunately my timber creations don't suffer as much expanding/contracting as places with hotter summers and cold winters. To mitigate the risk anyway, I predrilled the screw hole with a 3.5mm countersinking bit first, then re-drilled the hole only with a thicker 5mm drill bit (only through the base, not the table top). I used smallish 32mm 6ga screws. The purpose of this is that the screw has wiggle room around the shaft to move horizontally but it is still firmly fixed vertically between its head in the countersunk hole and the tail in the table top. If the table base expands a bit, the screws can move with it. If you don't have a countersinking drill bit, an alternative method is to use a screw washer around the head of the screw.
I was also careful not to glue the table top down to the base when I screwed it on. That way, if any splits did start to appear I can easily unscrew the table top to prevent it suffering further damage.
The final touch was to add the door and drawer handles :)


